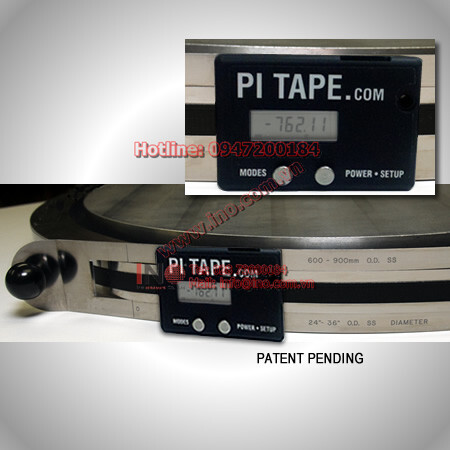
Our precision diameter tapes are manufactured to exacting standards in temperature controlled facilities at 68°F (20°C). The lines and numerals on our standard tapes are engraved and acid etched on a ground surface. The tapes have fixed readings that do not require periodic adjustments.
Our standard Imperial tapes (inches) read to 0.001” diameter with an accuracy of ±0.001” up to 144 inches.
Our standard metric tapes (millimeters) read to 0.01mm diameter with an accuracy of ±0.03mm up to 3,600 millimeters.
Each Pi Tape brand precision measuring tape is delivered with a Calibration Report traceable to the National Institute of Standards and Technology and all calibrations are performed in accordance with ANSI/NCSL Z540-1-1994, ISO/IEC 17025, ISO 10012-1, MIL-STD 45662A and 10CFR, part 21.
 |
 |
 |
Make certain the tape is free of damage and the tape and object to be measured are both clean.
Each line on the gage member represents .025”, while each line on the vernier represents .001”.
Wrap the tape around the object to be measured. The vernier scale should be just below the gauge scale. Tighten the tape around the object with 5 pounds tension for O.D. tapes (For I.D. tapes, use 0 pounds tension).
Locate the “zero” on the vernier scale and note the highest value achieved on the gage scale above it (the highest value to the left of the zero). In this example, that value is 5.075”.
Next, observe the vernier scale’s value at the point where it lines up exactly with a marked division line on the gauge scale. In this example, that value is 6 (.006”).
Finally, to obtain the diameter of the object, simply add the two values together: 5.075” + .006” = 5.081”
When reading the O.D. tape, make certain to apply a snug pull of 5 pounds tension, first making sure the tape and part have been properly cleaned.
When using a standard O.D. tape on an I.D. surface, add double the tape thickness to the reading to arrive at the I.D. of the part. It is suggested that direct I.D. tapes be used for inside diameter readings.
As a suggestion for checking very large diameters – pieces of masking tape can be used to hold the tape in the proper parallel position.
Pi Tape® Gauges are guaranteed +/- .001” accuracy on standard tapes up to 144”.
Care
When not in use, wipe clean and apply a light rust preventive oil. Store in tape
container.
No periodic adjustments are needed.
Make sure the tape has not been stepped on or kinked, which may destroy the
accuracy.


… [Trackback]
[…] Read More here on that Topic: ino.com.vn/khac-do-luong-kiem-tra/pi-tape-precision-outside-diameter-tapes/ […]
… [Trackback]
[…] Find More on that Topic: ino.com.vn/khac-do-luong-kiem-tra/pi-tape-precision-outside-diameter-tapes/ […]
… [Trackback]
[…] Information to that Topic: ino.com.vn/khac-do-luong-kiem-tra/pi-tape-precision-outside-diameter-tapes/ […]
… [Trackback]
[…] Read More Information here to that Topic: ino.com.vn/khac-do-luong-kiem-tra/pi-tape-precision-outside-diameter-tapes/ […]
… [Trackback]
[…] Here you can find 13771 more Information on that Topic: ino.com.vn/khac-do-luong-kiem-tra/pi-tape-precision-outside-diameter-tapes/ […]
… [Trackback]
[…] Here you can find 63664 additional Info to that Topic: ino.com.vn/khac-do-luong-kiem-tra/pi-tape-precision-outside-diameter-tapes/ […]
… [Trackback]
[…] Here you can find 49020 more Information on that Topic: ino.com.vn/khac-do-luong-kiem-tra/pi-tape-precision-outside-diameter-tapes/ […]